Tuesday, January 28, 2020

Tutorial Tuesday: Crochet Pop! Yarn Storage Basket!

Hello there and Happy Tuesday to you!  Discovered this yarn and my hands just had to test it out. The first project I wanted to create was more storage for my yarn and since there's a bit left, most likely I will make a matching blanket to tie in the look!


                                                                                  THE INGREDIENTS
1.5 Skeins of Bernat Pop! Bulky //147 yards // 100% Acrylic //
N/15 9.00 MM Crochet Hook
Yarn Needle
Craft Scissors

GAUGE
4"= 5 STS
4"=7 Rows

9 INCHES from the cuff
16 inches length

ABBREVIATIONS/STITCHES UTILIZED
sc=single crochet
hdc=half double crochet
hdc blo slst=back loop half double crochet
dc=double crochet
tch[s]=turning chain[s]
sts=stitches
sl st= slip stitch
ch=chain

Utilizing the Waist Coat Stitch Technique
Video Tutorial HERE

THE PATTERN
**WAISTCOAT SC STITCH UTILIZED THROUGHOUT

RND 1: SC into all of the STS for the entire round, 8 STS total, at the end of the round, SL ST to continue work.
RND 2: SC into all of the STS TWICE for the entire round, at the end of the round, SL ST to continue work.
RND 3: SC into the first ST once, then into the following ST DC TWICE for the entire round, at the end of the round, SL ST to continue work.
RND 4: SC into the first TWO STS once, then into the following ST DC TWICE for the entire round, at the end of the round, SL ST to continue work.
RND 5: SC into the first THREE STS once, then into the following ST DC TWICE for the entire round, at the end of the round, SL ST to continue work.
RND 6: SC into the first FOUR STS once, then into the following ST DC TWICE for the entire round, at the end of the round, SL ST to continue work.
RND 7: SC into the first  FIVE STS once, then into the following ST DC TWICE for the entire round, at the end of the round, SL ST to continue work.
RND 8: SC into the first SIX STS once, then into the following ST DC TWICE for the entire round, at the end of the round, SL ST to continue work.


RND 9: SC into the first SEVEN STS once, then into the following ST DC TWICE for the entire round, at the end of the round, SL ST to continue work.
RND 10: SC into the first EIGHT STS once, then into the following ST DC TWICE for the entire round, at the end of the round, SL ST to continue work.
RND 11: SC into the first  NINE STS once, then into the following ST DC TWICE for the entire round, at the end of the round, SL ST to continue work.
RND 12: SC into the first TEN STS once, then into the following ST DC TWICE for the entire round, at the end of the round, SL ST to continue work.
RND 13: SC into the first ELEVEN STS once, then into the following ST DC TWICE for the entire round, at the end of the round, SL ST to continue work.
RND 14: SC into the first  TWELVE STS once, then into the following ST DC TWICE for the entire round, at the end of the round, SL ST to continue work.


RND 15-RND 33: SC into all of the STS for the entire round, at the end of the round, SL ST to continue work. At the final round, [33] SL ST to complete final work.
Also, I cuffed the trim of the basket as a design look!


HAPPY CRAFTING!
#THEDREAMCROCHET

XX ashlee elle.


Tuesday, January 21, 2020

Tutorial Tuesday: The Artic Night Crochet Mittens

Hello there and Happy Tuesday to you!  I found this yarn in a project set from Marshalls on clearance, so I scooped it right up and I've finally came up with a design I could utilize them for. Wanting to reach back into the handmade accessory side, these mittens were one of the first designs I desired to begin with, so please enjoy!

                                                                                  THE INGREDIENTS
4 Colors of Super Bulky 5 yarn [Black yarn not Shown]
Used Lion Brand's Wool-Ease Thick and Quick // 80% Acrylic, 20% Wool //106 yards
N 9.00 MM Crochet Hook
Yarn Needle
Craft Scissors

ABBREVIATIONS/STITCHES UTILIZED
sc=single crochet
hdc=half double crochet
hdc blo slst=back loop half double crochet
dc=double crochet
tch[s]=turning chain[s]
sts=stitches
sl st= slip stitch
ch=chain

Utilizing the Waist Coat Stitch Technique
Video Tutorial HERE

THE PATTERN
NOTE: REPEAT STEP TWICE FOR BOTH HANDS OF COURSE! :)

First Color:
CH 16
Connect the last ST to the very first ST, by SL ST to start working in the round.
RND1-RND5: SC utilizing the Waist Coat Knit Stitch, by placing the hook into the middle of the single crochet stitch. After each round, SL ST to continue work.

Second Color:
RND6-RND10: SC utilizing the Waist Coat Knit Stitch, by placing the hook into the middle of the single crochet stitch. After each round, SL ST to continue work.

Third Color:
RND11-RND12: SC utilizing the Waist Coat Knit Stitch, by placing the hook into the middle of the single crochet stitch. After each round, SL ST to continue work.

--------------------------------------------------------

Creating the Thumb Holes LEFT SIDE
Third Color:
RND13: SC into the first 12 STS and CH 2 Skip 2 STS and SC into the remaining 2 STS for the round.

Creating the Thumb Holes RIGHT SIDE
Third Color:
RND13: SC into the first 12 STS and CH 2 Skip 2 STS and SC into the remaining 2 STS for the round.

--------------------------------------------------------

Third Color:
RND14-RND15: SC utilizing the Waist Coat Knit Stitch, by placing the hook into the middle of the single crochet stitch. After each round, SL ST to continue work.

Bottom Band [Black and White Yarn]
Black Yarn
RND16: SC2OG every ST to decrease for the entire round, After the round, SL ST to continue work.
White Yarn
RND17: SC2OG every ST to decrease for the entire round, After the round, SL ST to continue work.
Black Yarn
RND18: SC into all of the STS for the entire round, at the end of the round, SL ST to complete final work.

Thumb Section
Third Color:
Next, you will insert your hook into the skipped ST, from Row 13 and begin to work in 4 Rounds of SC, SL ST to continue work until you hit the final 4th Round, you will SL ST to complete final work.

Closing the Top Portion of the Mittens
Insert hook into Round 1 utilizing the Third Yarn Color
RND1-RND3: SC2OG every 2 STS to decrease for the entire round, After each round, SL ST to continue work. At final Round, SL ST to complete final work. Use tapestry sewing needle to enclose the mittens.


HAPPY CRAFTING!
#THEDREAMCROCHET
XX ashlee elle.

Tuesday, January 14, 2020

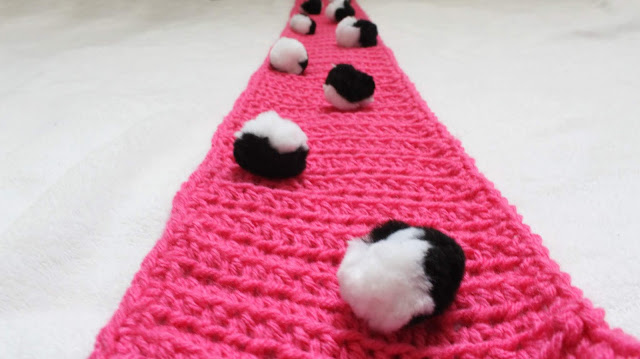
Tutorial Tuesday: Pom Pom It Up Crochet Scarf!

Hello there and Happy Tuesday to you!  Here's a pattern that I've had in mind for quite awhile and really wanted to jump at the chance to create it and share. Inspired by the Winter Collection, I wanted to do a pop of color scarf, highlighted by pom poms, that you can either create yourself or like I, found a batch of them from a project bag. Either way, I definitely want to experiment more with the pattern and make it little more funky in the near future, enjoy!


THE INGREDIENTS

Big Twist "Value Yarn" 380 yards/100% acrylic/6 oz / Medium 4 [half a skein utilized]
H/8 5.00MM Crochet Hook
Yarn Needle
Craft Scissors
pom poms

ABBREVIATIONS/STITCHES UTILIZED
sc=single crochet
hdc=half double crochet
hdc blo slst=back loop half double crochet
dc=double crochet
tch[s]=turning chain[s]
sts=stitches
sl st= slip stitch
ch=chain

Full Length 34.5 inches


THE PATTERN
CH 15 [6 inches width]

R1: SC into all of the STS for the entire row, at the end of the row, turn to continue work.
R2: HDC into all of the STS for the entire row, at the end of the row, turn to continue work.
R3: Back Loop Stitch Only HDC into all of the STS for the entire row, at the end of the row, turn to continue work.
R4: HDC into all of the STS for the entire row, at the end of the row, turn to continue work.
R5: Black Loop Stitch Only HDC into all of the STS for the entire row, at the end of the row, turn to continue work.
R6-R106: [Alternate the HDC and Back Post HDC] into all of the STS for the entire row, at the end of the row, turn to continue work.
R107: SC into all of the STS for the entire row, at the end of the final row, SL ST to complete final work.

SC around the entire finished piece solely once. SL ST to complete finishing technique.

Adding the Pom Poms
Using a string and a thin tapestry needle to apply the pom poms in sporadic formation wherever you please upon the scarf.


HAPPY CRAFTING!
#THEDREAMCROCHET
XX ashlee elle.