Hello there! Happy Halloween! Here is my complete project from last week's, What's On My Hook? A crochet over-sized sweater dress with pockets included. Even though I struggled with this design quite a bit, started over a lot, especially for cowl part of the sweater. Wasn't entirely sure how I wanted to go about it, but I am elated of how it turned out. Perfect for throwing a pair of leggings on, plus boots and once it becomes a bit chillier, I can throw a cropped jacket on with it. The dress is quite light and doesn't have the bulkiness feel of a sweater which I love and is pretty ace for the weather here!
The crochet technique I used, was the half double crochet, I stuck with the basics, though for the sleeve, cowl and the sleeves, I wanted to use a different type of pattern, different stitch, to give the sweater a subtle unique look.
The Yarn I used: Aran// Red Heart Super Saver
The Hook I used: J/10-6.00MM
The Pattern I used: Experimental: My Own!
Note: The hat I am wearing is available on my Etsy Shoppe here!
Also, I am planning to share these projects in the near future!
dream crochet pattern shoppe.
Thursday, October 31, 2013
HandMade: The Oversized Crochet Dress.
Labels:
crafts,
crochet,
crochet dress,
crocheted,
crocheting,
diy,
dress,
handmade,
oversized sweater dress,
sweater dress,
yarn
Wednesday, October 30, 2013
What's On My Hook?
Currently, I have this lovely deep shade of plum on my hook and actually started off a bit up in the air on what project I wanted to start next. I have a nice size of a list. This project is going to be a sweater! I have been wanting to create this specific design for quite some time now and this yarn is going to be it! Well, hopefully! ;)
I've had this yarn for quite awhile, (It's With Love, from Red Heart) purchased it from the clearance bin and it has just been sitting in my bin of yarn. Though now, it is coming along quite swimmingly and I feel confident on how it is going to come to be. Do wish me luck!
Question! Do you have any yarn in your collection that you haven't used yet?
Tuesday, October 29, 2013
DIY: Halloween Inspired Crochet Bows.
Hello there and Happy Tuesday! In the Halloween mood, here is another DIY, Crochet style, to wear. I found the little trinkets like the candy corn and cross and bones from Michaels' excursion, found them for about 79 cents. The brand is from Creatology, but for this tutorial you can use any similar kinds from any craft store, these are just the ones I used!
Note: Some of the patterns involve changing colors, here are some references that can assist you in that department! From Youtube!
Link #1
Link #2
Another reference for sewing in yarn ends:
Link # 1
The Ingredients: Left to Right
>> Trinket Necklace Kit (from Michaels' Craft Store/Creatology)
>> Black/Orange/Mustard Yellow/White (All from Red Heart)
>> Metal Barrette Clips
>> Hot Glue Gun (Hi Temp)
>> Scissors
>> Yarn Needle/ H/8-5.00MM Crochet Hook and a G/6-4.25MM Crochet Hook
The Candy Corn Hair Bow
Using the Orange/Yellow/White Yarn
Chain 8, Turn
Yellow Yarn: You will Single Crochet the entire Row, Turn
Continue Single Crochet to Row 2
Change colors
White Yarn: Single Crochet the entire Row 3, Turn
Continue Single Crochet to Row 4
Change colors
Orange Yarn: Single Crochet the entire Row 5, Turn
Continue Single Crochet to Row 6
Continue this method of alternating colors until Row 11
Knot and tie, sew in the ends!
Next, you will create the bow effect which will be used as a reference for the other bows as well!
With a yarn sewing needle, thread with a bit of yarn, go in between the stitches like so, straight in the middle of the bow. You will do the alternating threading back down as well.
Next, you will tighten the yarn and it should scrunch like this (above) knot the yarn and cut.
With the yellow yarn, wrap it around the bow so it can look a bit neat!With your hot glue gun already heated up and ready to go. Grab your trinket and glue it to the middle of the bow.
With the heated hot glue gun, attach the back of the bow to the metal barrette clip, hold firmly until dry.
Using the Orange Yarn
Chain 10
Row 1: Half Double Crochet for the entire Row and Turn
Row 2: You will repeat this method of the Half Double Crochet until Row 12..
Knot and cut. Sew in the ends from the cut.
[Apply the method of creating the bow, from The Candy Corn tutorial above.]
The Striped Bow
Using Black/Orange Yarn
Chain 8
Row 1: (Black Yarn) Single Crochet for the entire Row and Turn
Change Colors
Row 2: (Orange Yarn) Single Crochet for the entire Row and Turn
Change Colors
You will repeat this method until Row 11
Knot and cut. Sew in the yarn ends from the cut...
[Apply the method of creating the bow, from The Candy Corn tutorial above.]
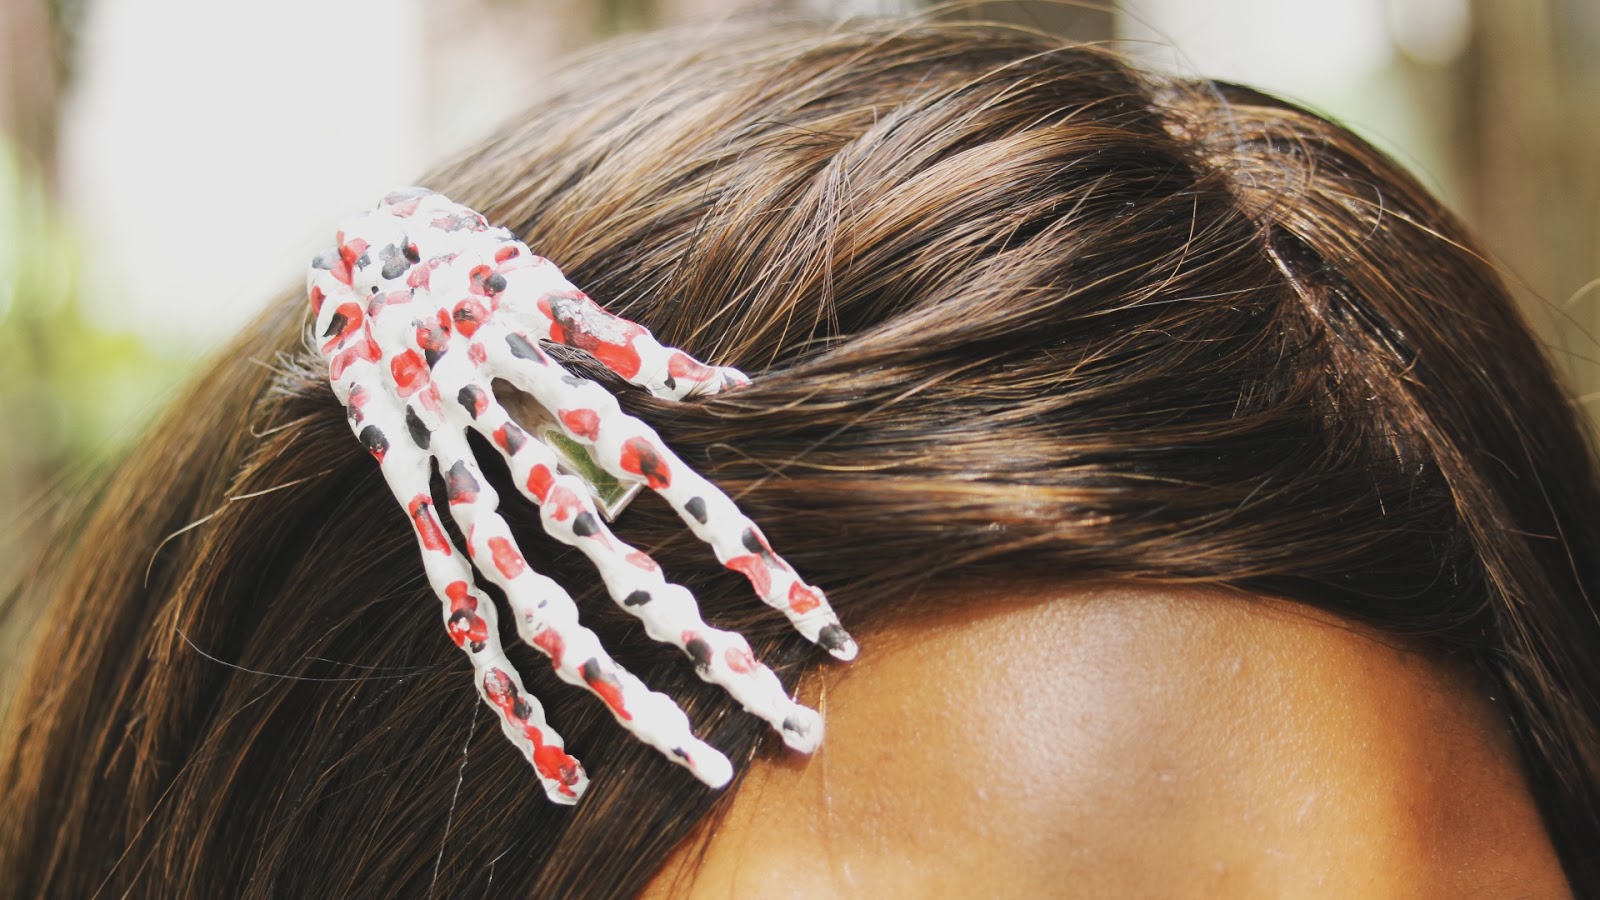
The Skull and Bones Bow
Chain 10
Row 1: (Black Yarn) Half Double Crochet for the entire Row and Turn
Continue this method throughout until Row 12
Knot and cut. Sew in the yarn ends from the cut.
[Apply the method of creating the bow, from The Candy Corn tutorial above.]
Labels:
crochet,
crochet a bow,
crocheted,
diy,
do it yourself,
freepattern,
hair accessories,
Halloween,
tutorial,
yarn
Monday, October 28, 2013
DIY: How To Make Skeleton Hand Hair Clips.
Hello there! I thought I'd start the week with an extra DIY non-crochet like (that one will be up tomorrow!) That I have been wanting to create for a bit of time. I found these skeleton hands at Michaels' and I did have a pair of these that I purchased last year, but they broke so I wanted to make my own version. The tutorial is quite easy and I feel it is quite perfect, not solely for the upcoming spooky season, but for a quirky twist to your everyday wear!
The Ingredients I Used:
>> skull hands (michaels')
>> metal alligator clips (michaels')
>> hot glue gun
>> poster paint (bought from the dollar store)
>> paintbrushes (from the dollar store)
Items not shown that I used:
Water for the paintbrushes
Paper towel to dry off the brushes
Canvas to mix the paint
All of the hands are pretty easy to create, just paint and experiment. For the blood stained hands, I painted the hand, twice, each time letting the hand dry about 15 mins. Then I reapplied for the second coat.
I added a bit of red, mixed a little bit of black to make the red look like blood.
Next, I went around the with the actual black paint and just splattered it about, there's no point in being proper and making it perfect because it's meant to be a bit out of sorts! After, you're done painting, let it dry for about 15-20 mins.
Once your skull hand is dry, use your hot glue gun and apply glue to the head of the alligator clip attach it to the palm of the hand. Hold it tight so that it is firm and dry.
Labels:
bone hands,
bones,
free tutorial,
hair clips,
Halloween,
handmade,
how to,
paint,
skeleton,
skull,
skull hair clips,
skull hands,
tutorial
Subscribe to:
Posts (Atom)