Showing posts with label crocheting. Show all posts

Tuesday, September 23, 2014

DIY: How To Crochet Easy Charm Bracelets.

Hello there! I've been wanting to create one of these little charm bracelets for awhile now and finally here they are! Actually, I was browsing around Michael's Craft Store as usual over the weekend,  I was looking through the jewelry section when these little bits of inspiration hit me.  Two of my favorite words that really hit me is Dream and Create. It is what I am all about and I am more than happy to share it!
Ingredients: 
Loops and Threads Woolike (Colors (Mauve & Sage))
2 Metal Connectors by ShortCuts
Scissors 
Crochet Hook B1-2.25MM
Yarn Sewing Needle and a Button (not shown)

Abbreviations:
SC=single crochet
HDC=half double crochet
SS=Slip Stitch
CH=Chain
YO=Yarn Over
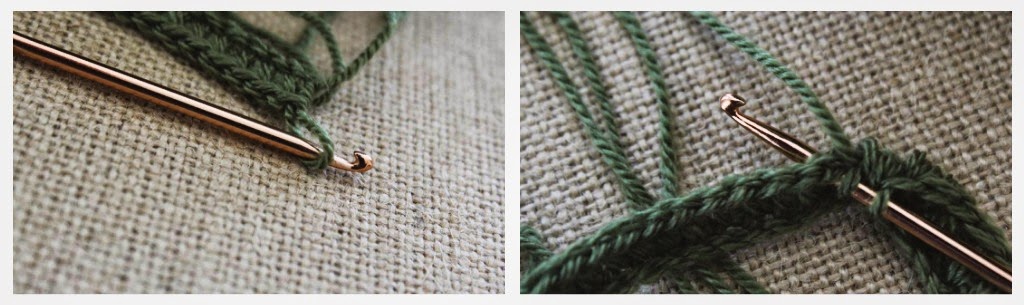
For the "Create Bracelet":
Using the Sage yarn.
Measure your wrist, for your own preferential size.
CH 38, Turn
HDC the entire first Row of the CH.
For the 2nd Row, YO, insert hook into the space underneath the stitch (photo on the right above)
YO, Pull through all 4.
You will continue this process through out the entire Row.
At the end of the Row, Tie off, cut, sew in the remaining yarn.
Next, You will insert the crochet piece through the metal connector.
With the button and the yarn sewing needle, you will thread it through and sew it to the end of the crochet piece.
For the Dream Bracelet:
You will CH 40 with the Mauve yarn. 
Connecting the last ST to the very ST.
You will SC the entire Row.
Connecting the last ST to the very ST, once again.
At the end of the Row, Tie off the remaining yarn.
Pulling the yarn through the metal connector hole, you will knot it around, along with the other side.


Keep creating and dreaming!
ashlee elle.

Wednesday, June 4, 2014

On My Hook.

Currently, I have been a bit obsessed with crop tops and tie front tops as well. So with this current project I wanted to experiment with a tie front project. I have a slight design that's been lingering in my head, so once again it turns out fairly close to the image I've been picturing. If not, then most likely it'll turn into something else for sure! Either way I'm down for the adventure.

For this project, I  am using Caron Simply Soft yarn, they are just carrying the colors I really like to worth with as well as the lightness of the yarn. Though I will be slowly, but shortly moving towards utilizing cotton yarn for the summer!
What are currently working on?
ashlee elle.

Wednesday, May 28, 2014

On My Hook.

The project I am currently working on, is one I have been putting off for a bit, going back and forth upon, to create other projects that have peaked my interest. I'm attempting to recreate the crochet shorts I made a few years back. With the pattern I created years ago, I'm planning to experiment upon it and see how I can recreate it. I'm hoping it comes out how I am picturing it, if not, it's back to the redrawing board! Or hopefully something new can blossom from the idea, which at times I found a lot more inspiring than the planned out ones.
Now I'm off to crochet!
ashlee elle.

Tuesday, May 27, 2014

DIY: Crochet West Halter Top.

Hello there! Here is a free pattern for this crochet top I made last week thought I'd share this crochet top idea with whoever might want to experiment with it! This pattern is customized personally for my size (small), utilizing your measurements and adjust to see fit!

Ingredients:
Yarn of your choice// I used Caron Simply Soft Yarn in White
Hook size// H8-5.00MM

Crochet Abbreviations:  
SC= single crochet
HDC= half double crochet

DC= double crochet
SS= slip stitch
CH= chain   
TO= turn over
ST(S) = stitch(es)

The Band: 
CH 8
Row 1: HDC in all STS
Row 2: CH 3 Skip 1 ST, DC in next ST 
Row 3: HDC in all STS
You will repeat this alternating method until Row 22
HDC all around the crochet strip band you just crocheted.
Once completed, you will start with the bra part of the halter top.
With skipping 20 STS  (for both sides of the bra)
Row 1: HDC 15 STS
Row 2-3 : SC the entire row
Row 4: Skip 1 ST SC the entire row skip last ST
Row 5:  Skip 1 st SC the entire row 
Row 6:  SC the entire row
Row 7:  Skip 1 ST SC the entire row 

Row 8:  Skip 1 ST SC the entire row 
You will continue decreasing until you reach 1 ST.
After completing the bra part of the halter top, [Row 1] you will HDC around both of the bra parts solely.
Left: [Row 2] Once more, you will HDC around the bra part.
Right: [Row 3]  CH 3- skip  1 ST, DC  in following ST skip 1 ST, DC in the following ST (repeat this method after the CH 3) for the whole Row
Left photo: With the sewing needle, cut off a little less than half an inch of yarn to sew the band together.
Row 1: HDC the entire row around the top.
Right photo: CH 3- skip  1 ST, DC  in following ST skip 1 ST, DC in the following ST (repeat this method after the CH 3) for the whole Row
Row 3: HDC the entire Row
Row 4-5: CH 3 skip  1 ST, DC in following ST (repeat this method after the CH 3) for the whole Row
Row 6-7: CH 3- skip  1 ST, DC  in following ST skip 1 ST, DC in the following ST (repeat this method after the CH 3) for the whole Row
DC in one ST(repeat this method after the CH 3) for the whole Row
Row 8:  HDC the entire Row
Row 9-10: CH 3 skip  1 ST, DC in following ST (repeat this method after the CH 3) for the whole Row
Row 12: CH 3- skip  1 ST, DC  in following ST skip 1 ST, DC in the following ST (repeat this method after the CH 3) for the whole Row
Row 13:  CH4 skip 1, SS into the following ST  (repeat this method until the end of the Row)
Creating both of the straps, from the last ST on the (bra part) CH 44 (or how long you want the straps to be.)
Please let me know if there are any issues regarding this pattern or any questions!
ashlee elle.

Wednesday, April 9, 2014

What's On My Hook.

Lately, I have been working on a really fun project for Easter Holiday which is approaching next week. It is a graphic piece experiment from my own design utilizing four different colors. Quite inspired by the spring times! I am quite excited to see how it all comes together, perceiving that this project is the first time I'm using a graphic in more of a dress form.
What are you currently working on?
//ashlee elle.

Thursday, March 6, 2014

HandMade: The Crochet Winged Dress.

Here is my newest project complete from last week's, "What's on my hook?" 
This design was actually solely meant to be a sweater, but I really wanted to expand it a bit and create a dress instead. Definitely want to go the maxi route next year, seeing as that is one of the projects I entirely want to venture into next time around. The sleeves on this dress are what made me want to create this, I love the idea of the over sized wing span.  For the bottom of the dress, I made it a bit form fitting. I wanted the exact opposite of the top of the dress, to show both sides of the spectrum!

I made the stitches a bit open so that there was breath ability, especially when Spring/Summer ever decides to hit us. We are entirely going to feel the heat.

The Yarn I used: Purple//Caron Simply Soft Yarn  
The Hook I used: J/10-6.00MM
The Pattern I used: Experimental: My Own!

//ashlee elle.

Wednesday, March 5, 2014

What's On My Hook.

What's on my Hook? This week, I am back to the graphic side of things, being heavily influenced by one of my favorite tv series. I just had to share my adoration for it by creating something handmade entirely inspired by it. It's truly an awesome feeling when you create an item and can proudly show off something that brings you a bit of happiness.

What are you currently working on?

 //ashlee elle.