Showing posts with label tutorial tuesday. Show all posts

Tuesday, August 25, 2015

DIY: How to Crochet A Cowl! Free Crochet Pattern!

Hello there! After a short break to work on some custom projects and orders, I have a handful of new Free Fall inspired crochet projects that I want to share! Perceiving my favorite season is swiftly approaching, my mind and notebooks, are engulfed with ideas and designs that I truly cannot wait to share! Enjoy!

Also, the leaf background is a DIY project I created myself!


Ingredients:    

Crochet Hook>> H/8-5.50MM 
Craft Scissors  
Yarn Sewing Needle
Scrap Yarn used>>Red Heart Super Saver


  Stitch guide:   

HDC= half double crochet// SC=single crochet// DC=double crochet// SS= slip stitch //ST(S)= stitch(es)// CH= chain R[number]= Row
CH 55
Connect the very last ST to the very first ST, you will be working in ROUNDS.
R1: HDC into all of the STS for the entire Row, at the end of the Row, SS to connect work.
R2-R3: *HDC into the very first ST, CH 1, Skip 1 ST, into the following ST, [after the skipped] HDC once into the ST, CH 1, Skip 1 ST...[*Repeat method for both Rows, at the end of each Row, SS to connect work..]
R4: HDC into all of the STS for the entire Row, at the end of the Row, SS to connect work.
R5: *HDC into the very first ST, CH 1, Skip 1 ST, into the following ST, [after the skipped] HDC once into the ST, CH 1, Skip 1 ST...[*Repeat method for both Rows, at the end of each Row SS to connect work..]
R6-R7: HDC into all of the STS for the entire Row, at the end of the Row, SS to connect work.
R8: *HDC into the very first ST, CH 1, Skip 1 ST, into the following ST, [after the skipped] HDC once into the ST, CH 1, Skip 1 ST...[*Repeat method for both Rows, at the end of each Row SS to connect work..]
R9-R11: HDC into all of the STS for the entire Row, at the end of the Row, SS to connect work.
R12: *HDC into the very first ST, CH 1, Skip 1 ST, into the following ST, [after the skipped] HDC once into the ST, CH 1, Skip 1 ST...[*Repeat method for both Rows, at the end of each Row SS to connect work..]
R13: HDC into all of the STS for the entire Row, at the end of the Row, SS to complete work, sew in the edges utilizing your yarn sewing needle.

ashlee elle.

Tuesday, June 9, 2015

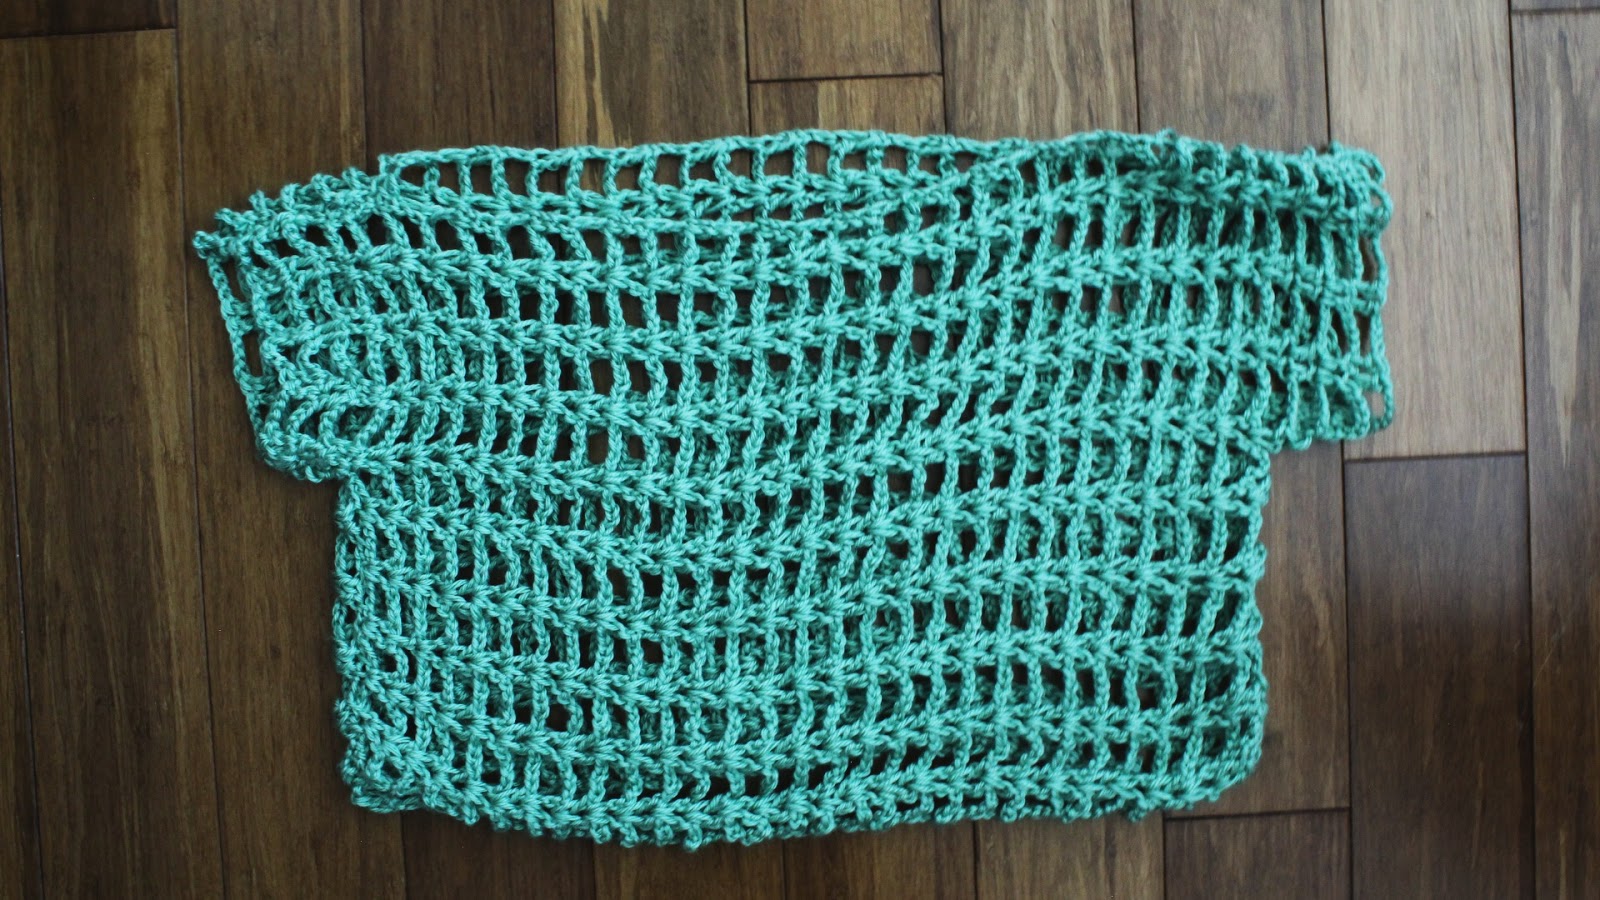
DIY: The Easy Crochet Summer Top! Free Crochet Pattern!

Hello there! Wanting to create a super easy crochet top for the Summer, I whipped up this pattern that doesn't take a handful of time to make and is quite perfect to wear! I love overlaying lacy tops over dresses so this top will for sure be a piece I will wear over and over! Hope you enjoy!
Ingredients:    
Crochet Hook>> H/8-5.50MM 
Craft Scissors  
Yarn Sewing Needle

Yarn used>>1 Skein Green (Caron Simply Soft Yarn) Medium 4
 
Stitch guide:  
HDC= half double crochet   

DC= double crochet   
SC= single crochet
SS= slip stitch
ST(S)= stitch(es)
CH= chain
R[number]= Row


Step 1
This is to start the top. You will be working from vertically to create the top
CH 61 (or half desired waist measurement) 

R1-R29: DC into the first ST, *CH 3, Skip 3 STS, DC [two times] into the following ST, CH 3, Skip 3 STS, DC [two times] into the following ST...[*Repeat method until the end of every Row, turn work after each Row, at the end of Row 29, the very last Row SS to complete work.]
 Note: You will be create STEP 1 TWICE.
Once both of the pieces are created, for the FRONT and the BACK of the top.
Turn the vertical crocheted piece Horizontally to begin the armhole/sleeves of the top.
Note: You will be creating the armholes for EACH side of the vertical crocheted piece.

Step 2
This step is to create the armholes/sleeves of the top. Note: You will be inserting hook into the 5th [double DC/ see photo] down.
R1-R3: DC into the first two STS, *CH 3, Skip 3 STS, DC two times into the following STS...
[*Repeat method until the end of every Row, turn work after each Row, at the end of Row 29, the very last Row SS to complete work.]

Step 3
(This step is to sew the crocheted pieces together to create your top.) Once both of the parts of the top are created. Lie both pieces flat. Now sew the sides together, leaving the armholes, the neckline and the bottom of the top free.

x, ashlee elle.

Tuesday, October 21, 2014

DIY: The Autumn Bow Crochet Shoulder Shrug & Scarf.

Hello there! Happy Tuesday to you. I've had this yarn in my bin for quite awhile and this design had been in my head for the same amount of time. So I thought, why not combine the two worlds to create this shoulder shrug? For one, I love shrugs, especially this one that can also be utilized as a scarf, which is the best of two worlds. Which is why I thought I'd share the free pattern for those who love a good deal!

Ingredients:
Yarn (I used Loops & Threads//Ginseng)
Scissors
Crochet hook (5MM)
Yarn sewing needle

Abbreviations:
SC=single crochet
HDC=half double crochet
SS=Slip Stitch
CH=Chain
YO=Yarn Over
 
Turn= Turn work around 

Using a puff stitch for this pattern. 
Here are some tutorials that might assist you for this pattern.
Link #1

This pattern was made for a Small/Medium. You may use your personal measurements to accommodate the cowl!

Firstly, CH 50.
Turn, HDC the entire Row 1 and turn at the end of the Row.

Row 2: DC into the first ST, *skip the following ST, DC into the next ST, *Repeat from the asterisk, End of Row, Turn.

Row 3: Starting a puff stitch. [Insert hook into stitch and draw up a loop, yarn over 5 times] into the hole that the following Row 2 created, pull through all 6 loops and CH 1. You will YO 5 times into each ST for the entire Row 3. End of Row, Turn.

Row 4: Continuing with the puff stitch.  [Insert hook into stitch and draw up a loop, yarn over 7 times] into the hole that the following Row 2 created, pull through all 8 loops and CH 1. You will create the puff stitch technique into each ST for the entire Row 4. End of Row, Turn.

Row 5: Continuing with the puff stitch.  [Insert hook into stitch and draw up a loop, yarn over 5 times] into the hole that the following Row 2 created, pull through all 6 loops and CH 1. You will create the puff stitch technique into each ST for the entire Row 5. End of Row, Turn.

Row 6: DC into the first ST, *skip the following ST, DC into the next ST, *Repeat from the asterisk until the end of Row, Turn.

Row 7-8: CH 3, *YO, DC into the hole presented by Row 6, CH 1, *Repeat from the asterisk until the end of Row, Turn.

Row 9: DC into the first 4 STS, DC two times into the 5th ST, DC into the next 4 STS, *Repeat from the asterisk until the end of Row, Turn.

Row 10: HDC the entire Row, SS at the end, cutting yarn off to sew in the edges with the yarn sewing needle.

With half a bit of yarn, if you choose. Tie the yarn right around the middle section of the shrug (I simply guessed the middle) to create the bow-esque look.
Happy Crafting!
ashlee elle.

Tuesday, September 30, 2014

DIY: The Crochet Bowler Hat. (Free Pattern!)

Hello there! This particular diy was entirely inspired by bowler hats I have been scoping out lately. During the Autumn season, I am a huge, huge hat fan, I have not stopped wearing them since the first day of Fall and that will continue on! After hitting up stores like Target and Forever 21, I was entirely inspired to create my own version of the hat for myself and for whoever would love to make one for themselves! 

UPDATE:  2024 The brand NEW version for this Hat, at thedreamcrochet.com 
Ingredients:
Crochet hook (H/8 5.00mm)
Yarn (Red Heart)
Scissors
Yarn Needle

Abbreviations:
SC=single crochet
HDC=half double crochet
SS=Slip Stitch
CH=Chain
YO=Yarn Over

First you will want to CH 3,
Connect the last ST to the very first ST.
CH 1

Row 1:
SC into the first ST, two times.
For the rest of the STS, you will SC into each ST, two times.
Which will equal out to 6 times.
Connect the last ST to the very first ST.
CH 1

Row 2:
SC into the first ST, one time.
For the next ST, SC two times into it,
For the following ST, you will SC into the ST one time.
Alternate between the two methods.
Which will equal out to 9 times.
Connect the last ST to the very first ST.
CH 1

Row 3:
SC into the first two STS, one time only.
For the following 3rd ST, you will SC into the ST one time.
Alternate this method for this entire Row.
Connect the last ST to the very first ST.
CH 1

Row 4:
SC into the first three STS, one time only.
For the following 4th ST, you will SC into the ST one time.
Alternate this method for this entire Row.
Connect the last ST to the very first ST.
CH 1

Row 5:
SC into the first four STS, one time only.
For the following 4th ST, you will SC into the ST one time.
Alternate this method for this entire Row.
Connect the last ST to the very first ST.
CH 1

Row 6: 
SC into the first five STS, one time only.
For the following 6th ST, you will SC into the ST one time.
Alternate this method for this entire Row.
Connect the last ST to the very first ST.
CH 1

Row 7: 
SC into the first six STS, one time only.
For the following 7th ST, you will SC into the ST one time.
Alternate this method for this entire Row.
Connect the last ST to the very first ST.
CH 1

Row 8: 
SC into the first seven STS, one time only.
For the following 8th ST, you will SC into the ST one time.
Alternate this method for this entire Row.
Connect the last ST to the very first ST.
CH 1

Row 9-15: 
HDC the entire Row.
Connect the last ST to the very first ST.
CH 1

Row 16: 
CH 3
Skip the next ST,
DC the following two STS.
CH 1
Skip the next ST,
DC the following two STS.
Alternate this method for this entire Row.
Connect the last ST to the very first ST.
CH 1

Row 17: 
HDC the entire Row.
Connect the last ST to the very first ST.
CH 1

Row 18:
SC into the first ST, two times.
For the rest of the STS, you will SC into each ST, two times.
Which will equal out to 6 times.
Connect the last ST to the very first ST.
CH 1


Row 19:
SC into the first ST, one time.
For the next ST, SC two times into it,
For the following ST, you will SC into the ST one time.
Alternate between the two methods.
Which will equal out to 9 times.
Connect the last ST to the very first ST.
CH 1

Row 20-22: 
HDC the entire Row.
Connect the last ST to the very first ST.
CH 1

Row 23: 
SC the entire Row.
Connect the last ST to the very first ST.
SS the last ST.

Sew in the remaining yarn edges!
Happy Crafting!
ashlee elle.

Tuesday, June 24, 2014

DIY: The Chunky Fabric Crochet Clutch.

This yarn has been sitting on the side and I have been designing idea over ideas on what to create with it. When this clutch came to mind, it's entirely perfect for the summer and can be used for whatever you want. From a make up case (with lining) to a crochet case or a simple clutch!
Fabric Yarn (you can make your own or try Lion Brand's)
Zipper (7in)
Crochet Hook N-9.00MM
Needle and thread
Yarn Sewing Needle
Scissors
(Fabric/ Not Shown-Did not use)


Crochet Abbreviations:  
SC= single crochet
HDC= half double crochet
DC= double crochet
SS= slip stitch
CH= chain   
TO= turn over
ST(S) = stitch(es)

Photo/Left To Right: 
CH 16
1ST Row: HDC the entire Row, Turn
Row 1-8: HDC across all Rows.
Note: You will create this method twice, for the front and back of the clutch.
With the zipper, (I hand sew!)  hear are a few references for this step!
Video Tutorial #2 
Written Tutorial #3
Using the a bit of the fabric, and threading it with the yarn sewing needle, you will sew both sides together, bottom and both sides.
For the handle, I measured my wrist and CH the most suitable amount to cut.
After cutting a bit of fabric and threading it into the yarn sewing needle, I attached the wrist chain thing (not sure the name of it) to the very top side of the clutch, sewing the wrist chain into the inside of the clutch from the outside.
Hope you enjoy the tutorial!
ashlee elle.

Tuesday, May 20, 2014

DIY: How To Crochet A Traveling Hook Pouch.

Hello there, I hope you had a lovely Tuesday! This DIY, was inspired by "on the run need" to create a little crochet traveling case when I am working on a project. Rather than carrying around my crochet hook case, that usually stays at home. I thought creating a smaller version to set in my purse, that won't take up much space, so that I use the hooks that I need for that specific project.
Ingredients: Left to Right.
>> Crochet hook/F5-3.75MM
>> Two rolls of twine (you can keep the color the same or you can use two diverse ones!) of 10 yards each. (I purchased these specific ones in Target, in the dollar section!)
>> Scissors
>> Yarn sewing needle


Crochet Abbreviations:  
SC= single crochet

HDC= half double crochet
SS= slip stitch
CH= chain 
 

TO= turn over 
STS = stitches

Left to Right:
>> CH 14 connect the last ST to the very first ST
We will work in rounds.
>> Row 1: HDC or SC in all of the STS
fhrtye
Note: Using the less than half an inch of the twine, you will sew the bottom of the pouch.
Continue HDC or SC from Row 1 to Row 11, or to the very end of the twine.
You will connect the next color, (if you choose) to continue on from Row 11 to Row 22.
Once completed, you will cut a bit of string to utilize as a draw string for the pouch.
Have fun crocheting!
ashlee elle.