Showing posts with label crochet top. Show all posts

Tuesday, June 14, 2016

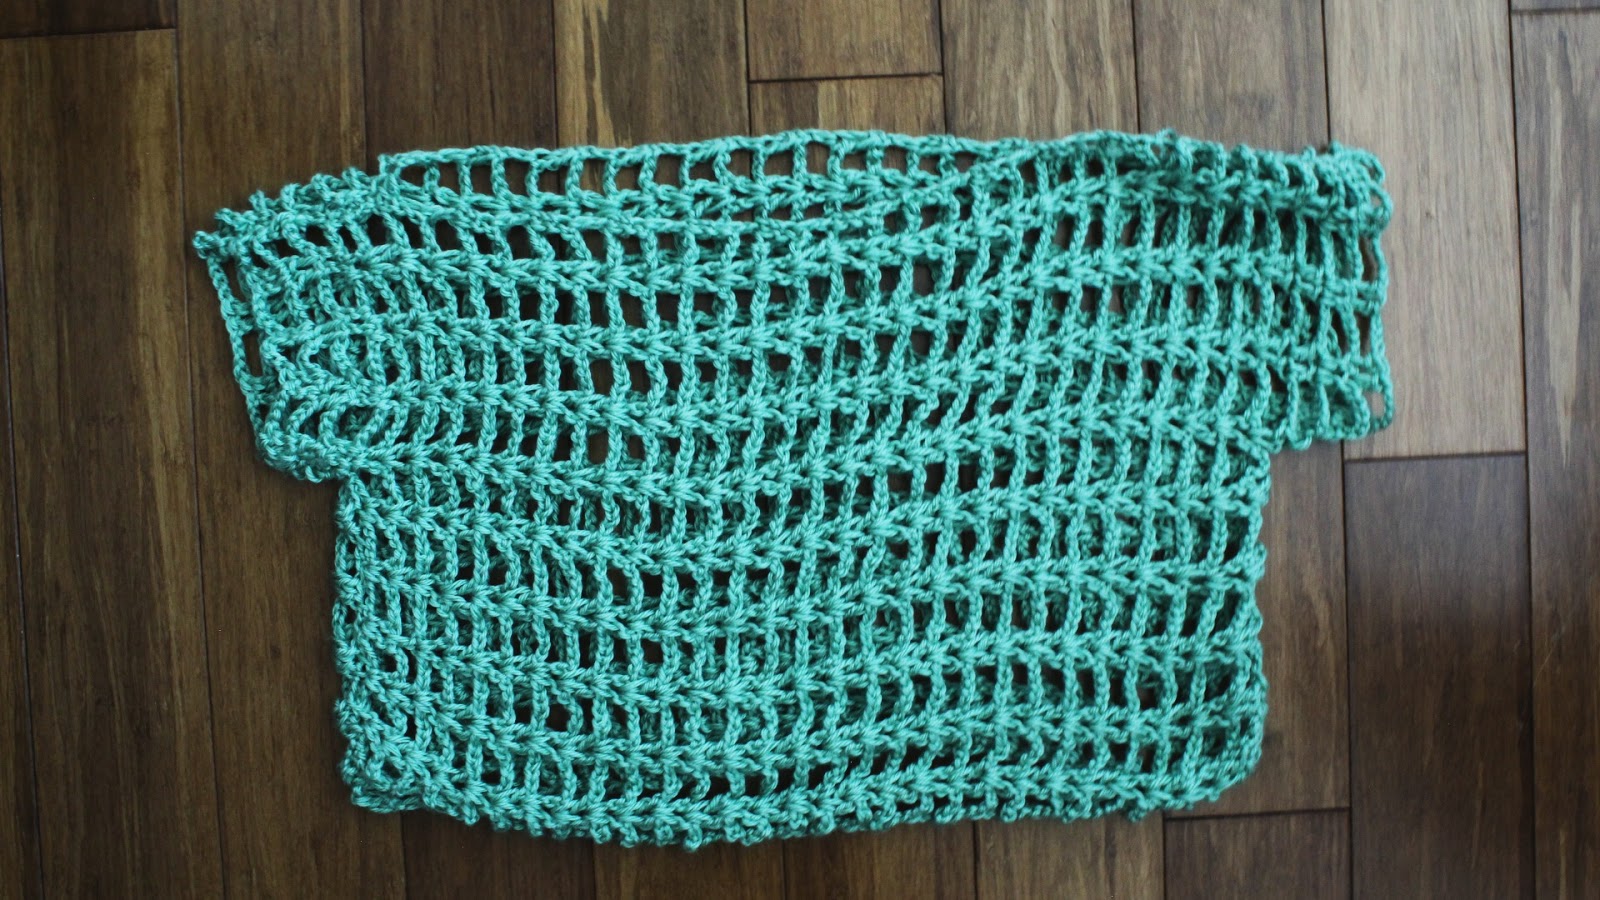
DIY // Summer Oversized Cropped Cover-All // Free Crochet Pattern!

Hello there! I hope you all had a lovely weekend! Quite soon I will be going out of town to enjoy some beautiful weather on the beach/boardwalk and I thought I would create a cute little coverall top specifically for it! 

I entirely wanted to play around with this design in the future, perhaps make it a bit longer and add some cute details to it as well. Which is why I wanted to share this free pattern so please enjoy!

Also, be sure to check out, DREAM CROCHET ON YOUTUBE for future free crochet videos!


Ingredients:     Crochet Hook>> H/8 5.50MM  Craft Scissors // Tapestry Needle //2 Skeins of Sugar N Cream Yarn // Medium 4 // Crop Top // Needle and Thread // Measuring Tape
  Stitch guide:    HDC= half double crochet// SC=single crochet// DC=double crochet// SS= slip stitch //ST(S)= stitch(es)// CH= chain R[number]= Row


STEP ONE //
CH 65 [Oversized Small/Medium ] 29 inches width
CH 83 [Oversized Large ] 37 inches width

R1: HDC into every ST for the entire Row, at the end of the Row turn work to continue, CH 2.
R2-R5: DC, CH 1, Skip 1 ST, DC into the following ST...[Repeat this method into every ST for ALL Rows, at the end of the each Row, CH 2, at the last [Row 5]turn work to continue, CH 1.]
R6: HDC, CH 1, Skip 1 ST, HDC into the following ST... [Repeat this method into every ST for the entire Row, at the end of the Row turn work to continue, CH 2.]
R7-R10:  DC, CH 1, Skip 1 ST, DC into the following ST...[Repeat this method into every ST for ALL Rows, at the end of the each Row, CH 2, at the last [Row 10]turn work to continue, CH 1.]
R11: HDC, CH 1, Skip 1 ST, HDC into the following ST... [Repeat this method into every ST for the entire Row, at the end of the Row turn work to continue, CH 2.]
R12-R13:  DC, CH 1, Skip 1 ST, DC into the following ST...[Repeat this method into every ST for ALL Rows, at the end of the each Row, CH 2, at the last [Row 13]turn work to continue, CH 1.]
R14:  DC into the first 18 STS--CH 28, Skip 28 STS, and insert hook into the following ST of [46] and DC for the remaining 18 STS, turn work and CH 2 to start on the next Row.
R15:  DC into every ST for ALL Rows [including the skipped] at the end of the each Row, CH 2, at the last [Row 13]turn work to continue, CH 2.
 R16: HDC, CH 1, Skip 1 ST, HDC into the following ST... [Repeat this method into every ST for the entire Row, at the end of the Row turn work to continue, CH 2.]
R17-R20:  DC into every ST for ALL Rows, at the end of the each Row, CH 2, at the last [Row 10]turn work to continue, CH 1.
R21:
HDC, CH 1, Skip 1 ST, HDC into the following ST... [Repeat this method into every ST for the entire Row, at the end of the Row turn work to continue, CH 2.]
R22-R25:  DC into every ST for ALL Rows, at the end of the each Row, CH 2, at the last [Row 10]turn work to continue, CH 1.
 R26: HDC, CH 1, Skip 1 ST, HDC into the following ST... [Repeat this method into every ST for the entire Row, at the end of the Row turn work to continue, CH 2.]
 R27: HDC into every ST for the entire Row, at the end of the Row, SS to complete final work.
Note: If you choose to make the piece longer, simply continue the process, repeating.
STEP TWO  
Utilizing your tapestry needle and a strand of yarn. Fold the crocheted piece over and you will sew BOTH sides together, about 2.5 inches.
Tag your creations with #dreamcrochet Happy Crafting! Ashlee Elle.  


Thursday, August 20, 2015

HandMade: The Be Mine Crochet Top.

Hello there! Hope you're having a lovely week! This is the second to last Summer inspired crochet project in my queue and its entirely a fave in my book. This yarn had a touch of whimsy to it, so I wanted to create a piece that would work off of that attribute. With creating a little bit of flair to the bottom of the top, it has the influence of a peplum top. The pattern is constructed utilizing basic crochet techniques to create a piece that is entirely functional and wearable all year round!

Pattern Details:
The yarn I used:  Caron One Pound [1 Skein]
The hook I used:I/9-5.50MM


Get The Be Mine Crochet Top Pattern at:


ashlee elle.

Thursday, June 11, 2015

HandMade: The Lively Co-ord Crochet Skirt and Crochet Top.

 Hello there! Hope you're having a lovely week! This design was brought about for my recent new love, coordinating outfits. I love the notion of having your outfit all sorted together, matching so perfectly. To be honest, I'm a huge mix and matcher (which will be another collection in the near future!) so creating a piece that go hand in hand with each other, would be out of the question. Though honestly, I think it's an awesome collaboration of two pieces that were simply meant to be.

This crochet pattern is an easy to follow, make it your own, longer or shorter design that you can create to your own personal style. Which is what my patterns are all about! I love this concept and I  am entirely not even thinking about stopping here! 


Pattern Details:
The yarn I used: 1 Jumbo Skein in white [Lion Brand Impeccable Yarn]
The hook I used: H/8-5.00MM


Get The Lively Co-Ord Crochet Set Pattern at:

x, ashlee elle.

Tuesday, June 9, 2015

DIY: The Easy Crochet Summer Top! Free Crochet Pattern!

Hello there! Wanting to create a super easy crochet top for the Summer, I whipped up this pattern that doesn't take a handful of time to make and is quite perfect to wear! I love overlaying lacy tops over dresses so this top will for sure be a piece I will wear over and over! Hope you enjoy!
Ingredients:    
Crochet Hook>> H/8-5.50MM 
Craft Scissors  
Yarn Sewing Needle

Yarn used>>1 Skein Green (Caron Simply Soft Yarn) Medium 4
 
Stitch guide:  
HDC= half double crochet   

DC= double crochet   
SC= single crochet
SS= slip stitch
ST(S)= stitch(es)
CH= chain
R[number]= Row


Step 1
This is to start the top. You will be working from vertically to create the top
CH 61 (or half desired waist measurement) 

R1-R29: DC into the first ST, *CH 3, Skip 3 STS, DC [two times] into the following ST, CH 3, Skip 3 STS, DC [two times] into the following ST...[*Repeat method until the end of every Row, turn work after each Row, at the end of Row 29, the very last Row SS to complete work.]
 Note: You will be create STEP 1 TWICE.
Once both of the pieces are created, for the FRONT and the BACK of the top.
Turn the vertical crocheted piece Horizontally to begin the armhole/sleeves of the top.
Note: You will be creating the armholes for EACH side of the vertical crocheted piece.

Step 2
This step is to create the armholes/sleeves of the top. Note: You will be inserting hook into the 5th [double DC/ see photo] down.
R1-R3: DC into the first two STS, *CH 3, Skip 3 STS, DC two times into the following STS...
[*Repeat method until the end of every Row, turn work after each Row, at the end of Row 29, the very last Row SS to complete work.]

Step 3
(This step is to sew the crocheted pieces together to create your top.) Once both of the parts of the top are created. Lie both pieces flat. Now sew the sides together, leaving the armholes, the neckline and the bottom of the top free.

x, ashlee elle.

Monday, May 11, 2015

Pop Up Crochet Pattern Collection!

Hello there! This little pop up pattern collection popped [for a lack of better term] into my head and I thought it would be a fun way to celebrate those who want to beat the heat this Summer with these crochet tops. So of course, these designs were inspired by the Summer time and the need to keep cool, but still looking cool! Currently, I am working on a bigger Spring/Summer collection that will feature a handful of dresses, skirts and a super cute romper, so stay tuned!

All patterns used only 1 skein for each pattern and the sole yarn utilized for each pattern was from Red Heart Super Saver!

Get The Beat The Heat Pattern Collection here at:


The Bow of Love Crochet Top Pattern
Strapless bow bandeau with straps aligned in the back of the top.
The Simpleton Crochet Top Pattern

Simple bandeau with halter string strap, with strings aligned in the back.
The Spring Breeze Crochet Top Pattern
Sleeveless v-neck top created with an open stitch technique, perfect for layering.
The Dream Catcher Crochet Top Pattern
Crochet halter top with a granny circle in the back of top with strings connecting.
The Sunshine Circle Crochet Top Pattern
Crochet halter v-neck bra-lette with an open back.
x ashlee elle.

Thursday, April 9, 2015

HandMade: The Whimsy Crochet Top! Pattern Now Available!

Hello there! Hope you're having a lovely week! This handmade crochet top was inspired by baby doll dresses and easy breezy Spring days. I wanted to create a top that had a mixture of being form fitting as well as roomy. It's entirely a design I plan on recreating in different styles as well as colors.

What I love about this top, is that it doesn't feel heavy at all and I can entirely wear it year round. One of the main things I strive to aim for when creating items is versatility and a strong comfort level. This top owns both of those wondrous attributes and I absolutely love wearing it!

Get The Whimsy Crochet Top Pattern at:

x ashlee elle.

Thursday, March 26, 2015

HandMade: The Loving Kind Open Crochet Top!

Hello there! Hope you're having a lovely week! This item has been on the sidelines for a little bit and I'm quite elated that is finally complete so I can wear it! This top was made for Spring and Summer chilly nights to throw over a dress or layered look for the Fall/Winter season. 

What I love about this top, is that it is comfy and with an open stitch technique which offers a lacy appearance when layered. It is an easy, modifiable crochet pattern to create and you'll find yourself wanting to create more than just one!

Get The Loving Kind Open Crochet Top Pattern at:

ashlee elle.